Zoo of Zero Turf Masters

In my hideously broken journey through Shootwrong, at this point I'm carrying four keys, and only the purple one is one the game expects the player to have at this point. The intended red key was missed in the septic tank, so it being used to open the western path now is safe, but it's unclear to me if the green and cyan are going to make my life easier or harder by already having at this point.
In a playthrough that doesn't try to break the game as often as the game tries to break me, I'd have gotten the red key long ago and already been done with the western path by now, so keep it in mind that I am doing this significantly later and with keys I really shouldn't have. Whatever gets me to those final two statue pieces.

So here we are, at the world's smallest golf course. I don't recall ever seeing a golf course included as part of a town in ZZT before. (Were it not for The Green, I wouldn't remember there being one ever.) It seem a bit strange to me that I haven't, given that ZZT provides exactly the kind of things you'd need to make one.
The course itself is mostly an excuse to explore the surrounding area. There's not much to actually do on this board in particular. Two tees are set up, but without a golf club there's no way to interact with them. Aside from that, it's just a lot of trees with some tigers (oh my god I just got that this is almost certainly a Tiger Woods joke) putting about on the other side of the water hazard.
The real goal here is the clubhouse in hopes of getting some more keys to explore whatever connects to the north and perhaps find some keys to open up those back rooms with some gems which seem a little suspicious given how important keys have been throughout Shootwrong.

The clubhouse is the most interesting location in all of of Shootwrong. The pro shop lacks in employees in order to make a purchase, but it makes up for it with a massive number of objects to play around with, ramping things up quite a bit from what I was expecting by this point.
The top left are a bunch of clubs for sale, at a rather expensive 500 gems per set. Seeing as how there's a big "CASINO" sign on the left, I assumed that these were actually intended to be purchased. They aren't though! Yet, incredibly unlike most ZZT games with phony items for sale as prohibitively expensive prices, this one actually is fully coded. If you somehow have 500 gems here, you can buy them, and the flag is set. This would let you skip a nasty puzzle coming up that does end with the player getting a club, but even with the casino, I don't think it's possible to get this many gems.

The option is also there to just steal them. It's an empty shop after all.
Clark is a man of morals and won't let the thought go unpunished. Trying to steal them results in getting chastised and losing twenty five health as a penalty. If this happens to kill you, it's your own fault.
Below the clubs, is a usable restroom complete with flushable toilet. Even in 1992 the tradition of ZZT toilets had been established.
Along the bottom, is just a row of miscellany items that the player doesn't recognize. Everything gives a "???" response when touched, save for the leftmost object which reveals five gems that can be taken without injury as a reward for thorough exploration.
This behavior carries over to the purple objects by the bomb. You either find gems, or are confused by what you're looking at. The bomb is a live one that has the good fortune of not killing the player for detonating it as they do in the military base. They will destroy anything in the blast radius however, which can result in missing out on some gems. The objects here that try to display "???" messages actually fail to do so, as unlike the objects on the left they don't have a space for a prefix which causes ZZT to interpret the text as a movement command that leads to an error message being set off instead.
Beyond that is a display of free golf balls. I helped myself to all ten, for no gain whatsoever.
On the top right, of course, are golf tees. T's in this case. Cute.


Finally, in the lower right is a vending machine that charges five gems to restore five health. Not a good value at all, but beggars can't be choosers as this is the only method in the game to repeatedly increase the player's health.
Thank you Mr. Clark for teaching me about old Coca-Cola slogans.

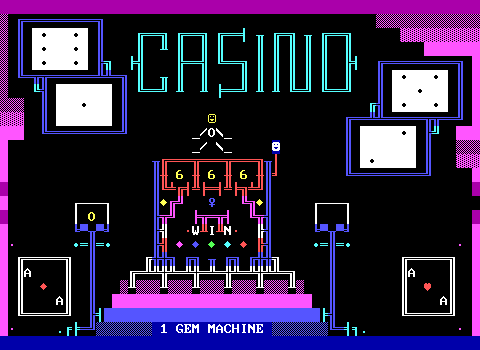
More than anything else in Shootwrong, it's the casino board that will instantly make people want to play the game upon seeing it. This is some incredible artwork, and easily the most surprising looking board in the entire game. The dice, the cards, the machine itself made from a mixture of actual linewalls and objects with various line characters. It's so stylish!
The lights surrounding the machine even have functional switches that allow you to toggle the lights inside. You get bonus points for conserving energy if you turn both of them off. It's so good.
Of course, this is Shootwrong, so what's the catch on this slot machine going to be?

One gem to play, one way to win.
The slot machine is not the infinite source of money you might suspect. It's not even a game of chance here. Clark actually turned the one armed bandit here into a game a of skill. Upon inserting a gem, the first two numbers rapidly cycle from "1" through "9", but they do so in sync with one another. The third digit does the same, while running at a slower speed. Your task is to touch the handle a second time to stop the reels and win the jackpot.

It took me nine attempts to win, with a prize of just fifteen gems. Hardly worth the effort, and certainly nowhere near enough to purchase the clubs.
So it seems like Clark did an okay job here, but that message upon winning caused me a lot of trouble. I figured that simply meant that this was a one-time prize, and nothing more, which honestly would kind of wild for a board with this much care put into its design only to be entirely optional.

Sometimes I leave notes for myself via the cheat prompt in screenshots, and I was just baffled by this. Why all this for a profit of six gems?
Look closely and see if you can figure it out.
Yeah. There's a blue key in that machine. That's the key to the other door in the pro shop. Just as in the septic tank I completely missed it, and this time thanks to the message about not playing the machine again, I just left it behind. You're supposed to play it again, which inexplicably transforms the red borders around the reels into tigers, providing free access to the key.
Once again, Dan Shootwrong was about to leave me impressed, and then had to go and ruin it. For the septic tank, I'll accept the blame. That's solely the fault of my eyes. Here, I think the message undermines the chances that players will keep trying the machine after winning once, even if they notice there's a blue key in there.

While I didn't have a blue key to the rest of the clubhouse, thanks to my exiting the mirror puzzle with a bunch of extra keys (something not actually possible in a valid playthrough), I did have a green key to explore the nearby golf cave. Lucky for me, the right path through the clubhouse exists to get the player a green key for this very door.
This was practically worth it though! As it just happens, the board to the right of the pro shop is hands down the worst board in this game to get through without cheating. Take a moment to let that sink in before I jump ahead to when I went back to see the boards I missed at the end of the game.

This time I jumped the gun a little. I already revealed that this is the worst board so you can't be filled with nothing but immense excitement at the carnival barker here who is easily one of the best pieces of ASCII art in ZZT I have ever seen.
He has a big funny hat. He has one palm out and a cane in the other. His outfit is colorful. His chair is as much a piece of work as he is. If this was any ZZT game other than Dan Shootwrong, he would instantly become a mascot. Instead he is a devil.

Here's the problem, which you can probably guess based on my attitude towards this board. You have to shoot every single target in the shooting gallery to proceed.

The balloons on the bottom are still, and easy pickings. After that though, the targets move. Other than the one up top, it's still nothing too unbearable. All of them move slowly, and in a fixed back-and-forth pattern. You just need to get the timing right.
It's the one up on top that causes the real problems. It moves mostly in a pattern. They move across the screen just like the others, except before turning around, they move randomly to the east or west. They also have a much shorter range of movement overall. In practice, this means that you can't just time your shots. You have to time them and properly compensate for whether that random movement is to the east or west. "Properly compensate" is the nicest possible way of saying "guess correctly". The distance your bullets have to travel mean that you are always going to have this random movement interfere no matter when you shoot the bullet.
This is worsened by the fact that this shooting gallery is more elaborate than it looks. Upon shooting targets, replacements come in. So this isn't a case of just hitting the top target once. Upon entering the board, it looks like you have six still targets and four moving ones. In reality you have six still and twenty moving. Five on each row.
Reminder that once you enter this room, you're locked in until you hit every single target. You're also expected to get here probably a lot earlier than I did. This would quickly become a maddening game of saving, shooting, and reloading on every miss. The barker sells ammo at a good price, fifty shots for ten gems, but this isn't actually unlimited. Each purchase opens one of the purple doors by the MAGAZINE rack as it were.

I just cheated. Not in a million years would I play this as intended.
The only thing of note about this board, is that this is a classic blunder rather than an odd instance of Clark's design. Dungeon of ZZT is guilty of this with its own overly-demanding target shooting challenge. It's something that comes up here and there, particularly in older ZZT worlds. It's terrible there, and it's terrible here.
...or is it?
Turns out there is a way to mitigate the shooting gallery to the still unpleasant initial impression of what's visible being all there is to it. Thanks to some freely placed ammo, it is possible to position the player along the edges of the gallery, where the set movement patterns of the targets never venture. From here, nothing stops you from shooting the later targets while they're invisible and still.
Actually doing this is still tedious in its own way as the extra targets show up on alternating sides. If you just quickly shoot multiple targets on just one side, those on the other side will wake up. You'd have to repeatedly go from one edge of the board to the other to do this safely, which is still not fun. Still better than playing it legit, and of course, even if you do this technique, the original targets are moving and still miserable to shoot.
More like Dan Shooting Gallery Wrong.

The barker is trying their hardest to make me like this board. The multiple parentheticals make this an unforgettable object to interact with.

Shooting them ruins the illusion and turns them hostile towards the player as they discard their outfit to hunt the player down forever.

ARE YOU NOT ENTERTAINED?

Anyway... the final target turns into a green key, but it's not the key to the cave. Upon hitting the final target, the locked doors, rather than opening, turn into two green doors. If you use your key to leave the shooting gallery and return to the pro shop, you've just soft-locked! You're supposed to head to this lovely looking bar "The Nineteenth Hole" and relax with a drink while a storm rolls in.

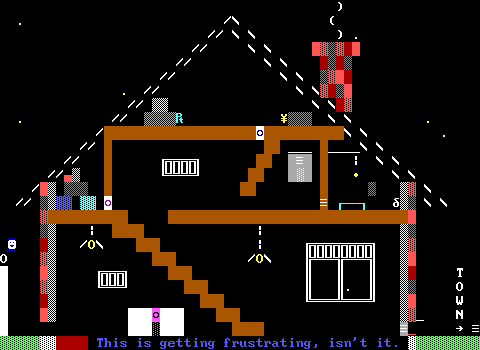
No really, there's some come thunder effects going on here. I'm also genuinely impressed at the background. These sideways flying boards are nothing new, but having a background is. I do wish more of these boards had them, but for a game that predates STK combined with these kind of boards requiring the player to move around basically the entire board prevents it from being an option other than flood filling with one of seven possible fake walls. This board is special in that unlike the house which requires climbing the roof and the bathroom which requires going outside the tub to get the rubber ducky there's actually space here that the player doesn't need to be able to reach.
So what we get to see here is Clark's graphical capabilities when he doesn't have to compensate for the player, making this the closest thing to what would be called an art board.
The interior continues to be fantastic, and Clark's lack of a care about the size of an object compared to the size of the furniture makes for another very detailed, and very surreal scene. Here we get to look not only at the bar, but also what's behind it, a large keg connected to the tap, plus a green key. Meanwhile the second green key is stuck on the ceiling where a beautiful fan spins about. The trophy game hanging on the wall is also a fine piece of ASCII art if I've ever seen it.

It's an incredibly showy board, undoubtedly one of the most well constructed boards of early ZZT worlds. The waitress will ask if you'd like a beer while you wait out the storm which when purchased leads to two things: this expertly made animation of the beer being poured and served, and a soft-lock!
Clark.
I won't reveal the whys of this one until the very end. Do be patient.

When not creating awkward game-ending moments, Clark is also a really big fan of the player interacting with things that break and fall to the ground. The bartender will quickly run over, fix it, and turn it back on. The time before its repair is when the player needs to make a move to get one of the green keys.
The key beneath the bar is probably the one to get first. This can be done by a fake wall directly below where the bartender rests, meaning pulling the chain once or ordering a beer (and soft-locking) are the only times the player can run down there and get the key. You'll have to hurry as well since if the bartender gets back to his position the player will be stuck beneath the bar permanently.

Back to the main playthrough. The second green key lets you open up the cave and start heading towards the back with no real goal in mind here. The cave board is divided into two halves which don't intersect. Strangely, there's a sign in the middle giving the cave's shape some meaning that's never visible in the dark. At most you'll be able to see the "W" and nothing else. Each half also has a single bat enemy that doesn't do much, but can bite.

I still can't decide is this board is beautiful or an absolute mess. It's definitely visually busy.
The lights are naturally on here, so the player is promptly informed that the way out is through a door on the bottom of the board. There looks to be a boulder puzzle in the way, thankfully not as maddening as the one back in the drain maze. This one requires some trickery to actually get through, just going south won't be enough, which is arguably worse, but the boulder layout is simple enough that it doesn't take long to realize that there has to be another way.
The player can't shoot on this board either which is important since there are a ton of breakables around that would really let the player make this board less claustrophobic.

The line of dots on the ground are the most obvious item of interest here. They're breadcrumbs, that lead to a trail of somebody who never found his way out of the cave. The bulk of this board doesn't matter, with the only things to really uncover being ways to reach various hearts for some health. Really though, health isn't much of an issue in this game. The drain maze had plenty of foes, but once you're done with that section of the game, there's surprisingly little shooting in Shootwrong.

Well, there was surprisingly little shooting. Clark does it again with this cave monster boss fight that comes out of nowhere. This is a rather early example of a giant boss fight in ZZT. Clark, of course having demonstrated that he knows what he's doing, creates an impressive encounter despite the limitations inherent to fighting an enemy that's locked into place. The green arrows at the end of the creature's limbs will slowly spit out stars which are made far more tolerable than usual thanks to the creature's continuous flashing. The walls that make up its body cycle between solid, normal, and breakables allowing the player to use those temporarily breakable portions as a way to handle any stars.
Clark also commits to his love of extensive animation. Small drops of water slowly drip from the stalactites, turning invisible when they land and returning to the top to create a loop. The monster's eyes move randomly, which often leads to some goofy expressions, that perhaps might have worked better if they used #try seek to follow the player around the room, something seen in Nuclear Madman.
The heart of the monster is its glaring weak point which requires some tunneling to get to safely. Shootwrong being what it is, it's also required that you tunnel up to the yellow key before you destroy the heart. If you don't, when the monster dies everything is erased except for the eyes, and you've soft-locked for the hundredth time as the key is now gone. This is of course something that had to explicitly be programmed in. There's no reason Clark couldn't have had the monster's death leave the key behind.

I'd imagine this was to make the fight take longer as the key is protected by a lot of objects that make reaching it difficult. However that same source of protection for the monster doubles as protection for the player. Once you're inside the stars really stop being a threat altogether making this just another annoying decision for how the game will be experienced.

After the cave monster proved my thoughts of Shootwrong being about solving puzzles more than anything else, it's time to actually solve another puzzle. A suspicious looking part of the cave gives way when examined, and reveals a tiny pusher puzzle in the top right. This is another case where the game will offer to outright give the player the solution, but this one was small enough that I was willing to give it a few tries myself before taking up the offer.
I can't speak ill of Clark's puzzle designs. He really knows how to do a lot with a little, and I was once again stuck. The bomb is a bit of a red herring as detonating it causes the cave to collapse and an instant game over.

The reward, is a free golf club. All this because the protagonist can't even borrow one from the pro shop.
Well, that's not entirely all of it. As the deceased man noted, the actually top right area of the board has a invisible cache of fifteen gems.
This puzzle is also required in order to actually leave the cave anyway, so any reward is a good one.

A few transporters are here to make the cave's layout a little more confusing. Heading south of the puzzle, west through another transporter, and then immediately turning back around to be transported adjacent to the east-facing transporter is required to reach a secret path of fake walls (alluded to at least by every red "normal" on this board actually being fake). This lets the player get to the boulders that block the exit from a different angle which is required to be able to actually slip through successfully.

The exit connects to the first dark cave board which suffers a cave-in after the player passes a specific point which lets loose some slimes to trap the player if they don't make it out fast enough.
The time provided is reasonable, though you might have some bad luck if the second bat happens to get in your way.

Back outside, but on the other part of the course, there's nothing new. What is weird is the way to get to the other side. None of the trees offer anything other than "Tree" for a description. The bridge offers the same message about being in poor shape and too dangerous to cross on this side as well as the other.

The only way actually out, is to shoot the breakable walls and just go around the river entirely. This is the sort of thing that normally would be considered an oversight with breakables being used for their aesthetic properties rather than their functions. I want to pinpoint this being mandatory as to why I thought that the key oversight in the practice hall was mandatory. This is the kind of thing that turns a game into a cruel riddle. Once you do this, you have to consider that anything may be required to see it through.
And don't think you can be clever by entering the cave from the exit first. You'll still trigger the slime-based collapse once you reach a certain point and be unable to venture deeper from this side.

All of this was for a golf club, with two balls on the tees to hit. The first will smack a tree, and your mulligan shot will be successful.

And by successful, I of course mean that a bunch of lions will show up, plus two keys. The white one is yet another fake, that begins running around until the player catches it before revealing the location of the actual white key in one of the trees on the course. A flag is set when the player has this information so you can't grab it early.

Those two keys are used to open the back of the club house, which seems like it will only result in a few gems for the player. Once the second door is opened though, one of the gems is turned into a yellow key. This is the intended key for Puzzle Park before entering the carnivorous plant room. For me it was pointless at this time.
But! It means that this world has been truly exhausted. The only places left unexplored is to the north of the carnivorous plants.